Docker initとは
Docker init はコンテナでアプリケーション開発する際に必要な、いくつかのファイルを自動生成してくれるコマンドオプションです。作られるファイルは次の三つです。
- .dockerignore
- Dockerfile
- compose.yaml
Docker initはDocker Desktop 4.18で追加された機能で、執筆日現在のバージョン(4.21.1)では次の言語に対応しています。 現在Beta扱いのコマンドとのことです。
- Go
- Python
- Node
- Rust
Rustが選択肢の中にない場合は古いDocker Desktopを利用している場合がありますので、アップデートしてください。
Docker initを使ってみる
事前準備
事前に次のようなファイルを用意しておきます。
- package.json
{
  "name": "docker_web_app",
  "version": "1.0.0",
  "description": "Node.js on Docker",
  "author": "First Last <first.last@example.com>",
  "main": "server.js",
  "scripts": {
    "start": "node server.js"
  },
  "dependencies": {
    "express": "^4.16.1"
  }
}
- server.js
'use strict';

const express = require('express');

// Constants
const PORT = 8080;
const HOST = '0.0.0.0';

// App
const app = express();
app.get('/', (req, res) => {
  res.send('Hello World');
});

app.listen(PORT, HOST, () => {
  console.log(`Running on http://${HOST}:${PORT}`);
});
docker initの実行
Docker Desktopとターミナルを起動しておきます。
次にdocker initと実行すると、次のようにメッセージが表示されると思います(色の見え方は環境による)。
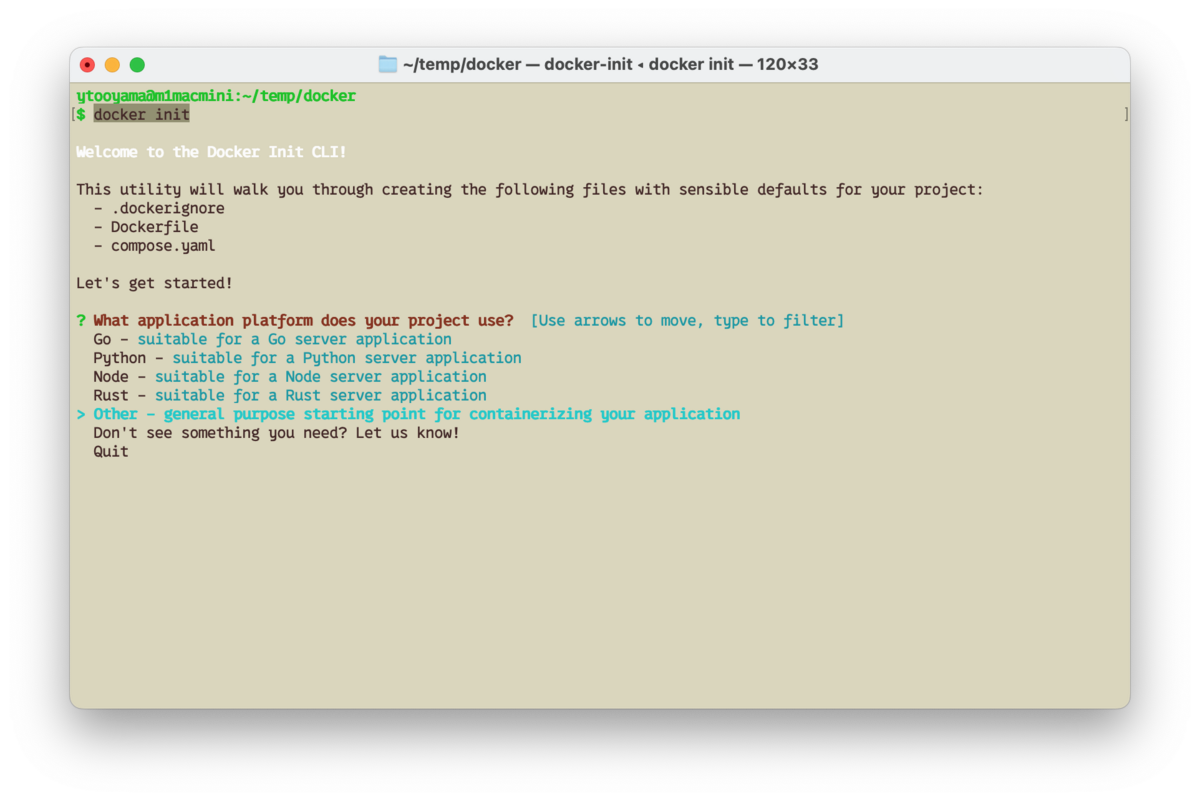
カレントディレクトリーに先の三つのファイルが作成されます。既に同じ名前のファイルがあると上書きするかメッセージが出るようです。 Nodeを選んでみます。
$ docker init

Welcome to the Docker Init CLI!

This utility will walk you through creating the following files with sensible defaults for your project:
  - .dockerignore
  - Dockerfile
  - compose.yaml

Let's get started!

? What application platform does your project use?  [Use arrows to move, type to filter]
  Go - suitable for a Go server application
  Python - suitable for a Python server application
> Node - suitable for a Node server application
  Rust - suitable for a Rust server application
  Other - general purpose starting point for containerizing your application
  Don't see something you need? Let us know!
  Quit
リターンキーを押すといくつかの質問が出てくるのでその質問に答えます。
? Do you want to overwrite them? Yes
? What application platform does your project use? Node
? What version of Node do you want to use? 18.16.1
? What command do you want to use to start the app? npm start
? What port does your server listen on? 8080

CREATED: .dockerignore
CREATED: Dockerfile
CREATED: compose.yaml

✔ Your Docker files are ready!

Take a moment to review them and tailor them to your application.

WARNING: The following files required to run your application were not found. Be sure to create them before running your application:
  - package-lock.json

When you're ready, start your application by running: docker compose up --build

Your application will be available at http://localhost:8080
ファイルが作成されました。
$ ls -lha
total 56
drwxr-xr-x  8 ytooyama  staff   256B  7 18 18:38 ./
drwxr-xr-x  5 ytooyama  staff   160B  7 18 18:33 ../
-rw-r--r--  1 ytooyama  staff   630B  7 18 18:34 .dockerignore
-rw-r--r--  1 ytooyama  staff   1.1K  7 18 18:38 Dockerfile
-rw-r--r--  1 ytooyama  staff   1.6K  7 18 18:34 compose.yaml
-rw-r--r--  1 ytooyama  staff   265B  7 18 18:26 package.json
-rw-r--r--  1 ytooyama  staff   287B  7 18 18:26 server.js
一つ一つファイルを見てみましょう。
.dockerignoreはイメージを作成する際にイメージに含めないファイルを定義するファイルです。
詳細はドキュメント に書かれています。
ファイルの中身を確認すると、.DS_Storeとか.env、.gitや.gitignore、Dockerfileなどが記述されています。最初の言語の選択によって記述される内容が変わりそうです。
compose.yamlはDocker Composeでコンテナをデプロイする際にするファイルのようです。
書かれる内容は非常にシンプルなので、実際に使うときはこのファイルに必要な内容を追記していくような使い方になりそうです。
$ cat compose.yaml
# Comments are provided throughout this file to help you get started.
# If you need more help, visit the Docker compose reference guide at
# https://docs.docker.com/compose/compose-file/

# Here the instructions define your application as a service called "server".
# This service is built from the Dockerfile in the current directory.
# You can add other services your application may depend on here, such as a
# database or a cache. For examples, see the Awesome Compose repository:
# https://github.com/docker/awesome-compose
services:
  server:
    build:
      context: .
    environment:
      NODE_ENV: production
    ports:
      - 8080:8080
(以下docker-compose.ymlの記述例)
...
DockerfileはDockerイメージをビルドする際に使うファイルです。ご存知の方も多いと思います。
Dockerfileの書き方は普段はネットで探したものを参考に書いていくと思いますが、
生成されるテンプレートはベストプラクティスに準拠されたものが生成されます。
生成されたDockerfileをNode.js Web アプリケーションをDocker化する を参考にして、少し書き換えます。
$ cat Dockerfile
# syntax=docker/dockerfile:1

# Comments are provided throughout this file to help you get started.
# If you need more help, visit the Dockerfile reference guide at
# https://docs.docker.com/engine/reference/builder/

ARG NODE_VERSION=18.16.1
FROM node:${NODE_VERSION}

# Use production node environment by default.
#ENV NODE_ENV production

WORKDIR /usr/src/app

# Download dependencies as a separate step to take advantage of Docker's caching.
# Leverage a cache mount to /root/.npm to speed up subsequent builds.
# Leverage a bind mounts to package.json and package-lock.json to avoid having to copy them into
# into this layer.
#RUN --mount=type=bind,source=package.json,target=package.json \
#    --mount=type=bind,source=package-lock.json,target=package-lock.json \
#    --mount=type=cache,target=/root/.npm \
#    npm ci --omit=dev

# Run the application as a non-root user.
#USER node

COPY package*.json ./
RUN npm install

# Copy the rest of the source files into the image.
COPY . .

# Expose the port that the application listens on.
EXPOSE 8080

# Run the application.
CMD [ "node", "server.js" ]
実行してみる
このディレクトリー上でdocker compose up --buildを実行してみます。
すると、イメージのビルドの後、そのイメージを使ってアプリケーションが実行されます。
$ docker compose up --build
[+] Building 4.7s (14/14) FINISHED
 => [server internal] load build definition from Dockerfile                                                                                          0.0s
 => => transferring dockerfile: 1.15kB                                                                                                               0.0s
 => [server internal] load .dockerignore                                                                                                             0.0s
 => => transferring context: 672B                                                                                                                    0.0s
 => [server] resolve image config for docker.io/docker/dockerfile:1                                                                                  2.7s
 => [server auth] docker/dockerfile:pull token for registry-1.docker.io                                                                              0.0s
 => CACHED [server] docker-image://docker.io/docker/dockerfile:1@sha256:39b85bbfa7536a5feceb7372a0817649ecb2724562a38360f4d6a7782a409b14             0.0s
 => [server internal] load metadata for docker.io/library/node:18.16.1                                                                               1.8s
 => [server auth] library/node:pull token for registry-1.docker.io                                                                                   0.0s
 => [server 1/5] FROM docker.io/library/node:18.16.1@sha256:f4698d49371c8a9fa7dd78b97fb2a532213903066e47966542b3b1d403449da4                         0.0s
 => [server internal] load build context                                                                                                             0.0s
 => => transferring context: 150B                                                                                                                    0.0s
 => CACHED [server 2/5] WORKDIR /usr/src/app                                                                                                         0.0s
 => CACHED [server 3/5] COPY package*.json ./                                                                                                        0.0s
 => CACHED [server 4/5] RUN npm install                                                                                                              0.0s
 => CACHED [server 5/5] COPY . .                                                                                                                     0.0s
 => [server] exporting to image                                                                                                                      0.0s
 => => exporting layers                                                                                                                              0.0s
 => => writing image sha256:fa32823859056a246afd635df71d1a6d7dba580f1a255e512119c0c6d4d0f412                                                         0.0s
 => => naming to docker.io/library/docker-server                                                                                                     0.0s
[+] Running 1/1
 ✔ Container docker-server-1  Created                                                                                                                0.0s
Attaching to docker-server-1
docker-server-1  | Running on http://0.0.0.0:8080
ブラウザーでhttp://localhost:8080/にアクセスすると、「Hello World」と表示されます。

このアプリを停止するにはdocker compose up --buildを実行したシェルをCTRL+Cで中止してください。
Pythonも試してみる
次のようなファイルを作って、docker initを再度試してみます。
- requirements.txt
flask >= 2.3.2
- server.py
from flask import Flask

app = Flask(__name__)

@app.route("/")
def hello_world():
    return "<p>Hello world!</p>"

if __name__ == "__main__":
    app.run(host="0.0.0.0", port=8081, debug=True)
同様に、docker initを実行します。
$ docker init

Welcome to the Docker Init CLI!

Let's get started!

? What application platform does your project use?  [Use arrows to move, type to filter]
  Go - suitable for a Go server application
> Python - suitable for a Python server application
...

? Do you want to overwrite them? Yes
? What application platform does your project use? Python
? What version of Python do you want to use? 3.11.4
? What is the command to run your app? python3 server.py

$ docker compose up --build
アプリにアクセスできることを確認します。
$ curl http://localhost:8081
<p>Hello world!</p>
このような感じでDocker initを使うと、ローカル環境のDocker Desktopで開発中のコンテナアプリケーションのイメージ作成から動作確認などができて便利でした。
コンテナでアプリケーションを開発する際の事前準備って割と色々なことが必要だったりするので、はじめの一歩としてDocker initを使うのは便利なんじゃないかと思いました。皆さんもDocker Desktopをインストールして、試してみてください。
